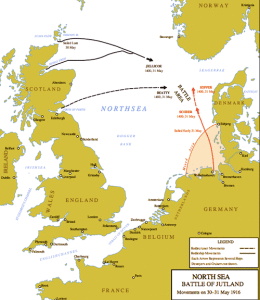
Map showing the routes of the British and German Fleets to the Battle of Jutland
World War I, fought from 1914 to 1918, was one of the deadliest wars in history, with an estimated nine million soldiers killed. The total killed including civilians exceeded fifteen million, which is the minimum estimate. World War I initially started when Austrian Archduke Franz Ferdinand and his wife were killed in the city of Sarajevo by a group of assassins from Serbia. Austria-Hungary declared war on Serbia, and a chain reaction followed with many countries, either by treaty obligations or by choice declared war on one another.
The countries involved on the “Allied” side included France, Russia, Italy, Japan, the United States, British Empire, and a few others. The United States entered World War I in 1917, while Russia withdrew from the war by signing a peace treaty the same year after the Russian Revolution. The “Central Powers” consisted of the countries of Germany, Austria-Hungary, Bulgaria, and the Ottoman Empire.
The Battle of Jutland was a large World War I naval battle fought by the German Imperial Navy against the British Royal Navy. The battle was fought 100 years ago from May 31 to June 1, 1916 in the North Sea, near the coast of Denmark’s Jutland Peninsula. It is the largest modern era naval battle involving mostly Battleships. In 1916 Aircraft Carriers had yet to come into widespread use and radar had not been developed yet.

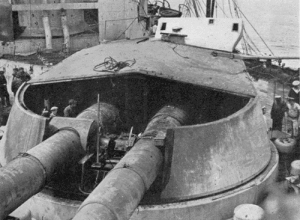
Drawing of a typical World War I Battleship or
Battlecruiser main Gun Turret
By World War I, Battleships had evolved into heavily armored steel ships armed with guns having a bore diameter of 11 to 15 inches. This type of Battleship was called a “Dreadnought Battleship” after HMS Dreadnought, which was the first “all-big-gun” Battleship built. As Battleships of the era were relatively slow, another type of ship was developed; the Battlecruiser. Battlecruisers were the same size as Battleships and carried the same big guns, but had thinner armor to gain faster speed. German Battleships and Battlecruisers generally had better armor protection than their British counterparts, but smaller caliber guns. At the time, the British Navy outnumbered the German Navy in Battleships (28 to 16) and Battlecruisers (9 to 5)
By May of 1916, almost two years into World War I, some small naval skirmishes had been fought, but a large naval battle had yet to happen. The German Navy had been planning a battle where they would lure out and destroy a portion of the British Fleet. The Germans realized they were at a disadvantage fighting the entire British Fleet in a full scale naval battle. The plan involved staging German U-Boats (Submarines) outside of the British Naval Bases to ambush and pick off some of the British Ships before they reached the German Fleet. German Zeppelins (Blimps) were to be used for scouting and to warn of the approach of any British ships. The German Fleet as a whole was under the command of Admiral Reinhard Scheer, while the German Battlecruisers were commanded by Admiral Franz von Hipper.
Unfortunately for the Germans, the British had recently obtained a copy of the German Naval codes and had been decoding German Naval radio traffic. Learning of an impending German fleet movement, the British fleet under the overall command of Admiral John Jellicoe, started leaving their ports before the German U-Boats were in position to ambush them. The British Battlecruisers under Admiral David Beatty also left their port with the rest of the fleet.
Two German U-boats trying to get to their planned ambush positions sighted part of the British Fleet leaving their ports in Scotland and reported this by radio. But German Naval Headquarters took this information to mean that only part of the British fleet had sailed. Similarly, the British Intelligence office monitoring the German Navy radio traffic reported that only the German Battlecruisers had sailed and that Admiral Scheer and his Battleships remained in port, the stage was set for the Battle of Jutland.
May 31st found the fleets sailing towards each other with Battlecruisers from both sides in scouting positions ahead of their respective fleets. The weather was hazy with intermittent fog, rendering the German scouting Zeppelins useless. Around 2:20PM, some smaller ships made contact and fired at each other. Admiral Beatty and the British Battlecruiser Fleet were sighted by Admiral Hipper and the German Battlecruisers around 3:22PM. Admiral Hipper decided to use his Battlecruisers to engage in a “running battle” with Admiral Beatty’s Battlecruisers while drawing the British ships south towards the rest of the German Fleet. The Battlecruisers opened fire on each other around 3:48PM at a range of around 15,000 yards.
At the time, signal flags were used for close naval ship-to-ship communications despite a majority of the ships of the time being equipped with radio telegraphs. Admiral Beatty in his Flagship HMS Lion, had ordered the rest of the British Battlecruisers to engage the German Battlecruisers on a one-on-one basis. Difficulty in seeing the signal flags due to the hazy conditions meant that the British plan quickly fell apart. Admiral Hipper in his Flagship SMS Lützow, and the other German battlecruisers quickly managed to hit three of the British Battlecruisers. Several minutes would pass before the British managed to score their first hit on a German Ship. The gun crews on SMS Lützow scored the first major hit of the battle when they managed to hit and wreck a gun turret on HMS Lion, most of the turret crew was killed instantly by the resulting fire and explosion. Turret Commander Francis Harvey, who was seriously wounded, ordered the magazine (gun powder storage) doors closed and the turret flooded with seawater. This action saved the ship from possible destruction, but Harvey and the rest of the surviving turret crew drowned in the process. HMS Indefatigable was not so lucky and was hit several times by SMS Von der Tann. Torn apart by a gun turret explosion, HMS Indefatigable sank rapidly. Only two out of the crew of 1,019 survived.
Gun Turret on HMS Lion after the Battle of Jutland; the roof has been blown off. Picture from the book “The Fighting at Jutland” published 1921.
By 4:25PM, the British Battlecruiser HMS Queen Mary was also hit several times and disintegrated when the ammunition magazines exploded. 1,266 crewmen perished, leaving nine survivors. At this point, German ships had managed to score forty-two hits on British ships, compared to only eleven hits made by the British. Admiral Beatty on the bridge of HMS Lion, made the famous remark: “there seems to be something wrong with our bloody ships today.”
Admiral Scheer and his German Battleships sighted the distant Battlecruisers action around 4:30PM. A British Light Cruiser reported sighting the main German fleet while dodging incoming shells. This was the first indication to the British Admirals that the German Battleship Fleet was even out of port. Admiral Beatty responded by turning the British Battlecruiser fleet around to draw the main German Battleship Fleet North into firing range of the approaching British Battleships. The German Battlecruisers eagerly turned around with the German Battleships not far behind to chase the British ships apparently fleeing from them. More difficulties in signaling meant that the lead group of British Battleships had no idea what was going on until the remaining British Battlecruisers passed them at high speed going the opposite direction. Admiral Jellicoe and the rest of the British Battleships still did not know the exact position of the German Fleet and signaled Admiral Beatty for fifteen minutes trying to find out. After receiving confusing reports, he deployed the British Battleships in one line so that all of the ships could fire when the German Ships were in range.
Meanwhile, German Admirals Scheer and Hipper managed to join up and combine their forces, still unaware that they were racing towards the main British Fleet, which they thought was still in port. Around 6:19PM several of the German Battlecruisers in the lead came under fire by British ships. SMS Lützow was hit several times but was still able to fight. At 6:30PM, the British Battlecruiser HMS Invincible suddenly appeared out of the haze directly in front of the German Ships. SMS Lützow and Derfflinger quickly fired several salvos from their guns and sank HMS Invincible in less than two minutes. There were only six survivors out of a crew of 1,032. With his flagship flooding badly, Admiral Hipper was forced to leave SMS Lützow and transfer to a small Torpedo Boat. A few minutes later as the German ships emerged from the smoke and mist, they were quite shocked to see the British Battleship Fleet directly ahead, which they assumed was still in port. Admiral Scheer quickly ordered the entire German Fleet to turn around. The Fleet executed a perfect 180° turn in unison, which was a well-practiced emergency maneuver. Only ten of the British Battleships managed to open fire before the German Fleet disappeared back into the mist. Instead of directly pursuing the German Fleet, Admiral Jellicoe had the British Fleet sail South East to try and get parallel to the Germans. But Admiral Scheer had other plans, at 6:55PM he ordered the German Fleet to execute another 180° turn directly towards the British Fleet. As the German Fleet came back into range, five German Battleships were damaged by British shellfire, with only one British ship hit in return.
At 7:17PM, Admiral Scheer turned his outnumbered fleet in yet another 180° turn away from the British ships, but this time it was performed with difficulty, as the German Fleet began to lose formation under the heavy gunfire. Scheer then ordered a torpedo attack by his smaller ships and sent the remaining German Battlecruisers charging in to give the main German Fleet time to escape. As Admiral Hipper was still aboard a torpedo boat and unable to command his Battlecruisers for this attack, Captain Hartog on SMS Derfflinger led the already damaged German Battlecruisers into “the greatest concentration of naval gunfire any fleet commander had ever faced”. In what became known as the “death ride”, all of the German Battlecruisers except one was badly damaged, but none were sunk as the British Ships fired at them. SMS Derfflinger suffered 157 killed and another 26 wounded during this action, which was the highest casualty rate on any ship not sunk during the entire battle.
During the night, the German Fleet attempted to escape from the British Fleet. Admiral Hipper managed to get onboard SMS Moltke at 9:15PM. The severely damaged SMS Lützow was unable to continue and was intentionally sunk by German Destroyers. Several times throughout the night, ships from opposing sides blundered into each other and several small battles occurred, sometimes at point blank range. The British Cruiser, HMS Black Prince was one of the ships sunk with the loss of all 857 of her crew. SMS Pommern, an older German Battleship already weakened by battle damage, was torpedoed by a British Destroyer around 3:10AM. Breaking in half, the Pommern quickly sank with no survivors out of 839 crewmen. Other times ships passed each other in the dark, but withheld their fire as they could not identify each other. The crew of a British Destroyer found themselves right in the middle of four German Battleships, but managed to escape.
Sunrise on June 1 found the German Fleet trying to make the safety of German Minefields along the Danish Coast and then port. The British Fleet, realizing that the Germans had escaped, also turned and headed for port. The heavily damaged German Battlecruiser SMS Seydlitz, which had been left behind by the rest of the German Fleet, was the last German Ship to make port on the morning of June 2nd with her bow barely above water.
Both the British and the Germans would claim victory, and the outcome of the Battle has been debated for years. The British Fleet suffered 6,094 killed, 674 wounded, 3 Battlecruisers sunk, and 11 smaller ships sunk. While the Germans suffered 2,551 killed, 507 wounded, 1 Battlecruiser sunk, 1 Battleship sunk, and 9 smaller ships sunk.

Sixteen year old British Sailor John Cornwell depicted as the only survivor at his gun position after the Battle of Jutland. – from the archives of the Illustrated London News
Two of the decorated Heroes of the Battle of Jutland were Francis Harvey, who had perished saving the HMS Lion from exploding, and John Cornwell. John Cornwell was a sixteen year old Sailor on the British Light Cruiser HMS Chester which had accompanied the British Battlecruisers. After the battle, Cornwell was found to be the only survivor at his badly damaged gun position. Although seriously wounded, John Cornwell was still at his post waiting for orders. He survived long enough to make it back to port, but died at the hospital before his Mother arrived. A Boy Scout Badge still used today in the United Kingdom was named after him. The 5.5” gun from HMS Chester on which he served was preserved and is on display today at the Imperial War Museum in London.
World War I would drag on until the armistice in November of 1918. In late 1917, the U.S. Navy sent five Battleships to join the British Navy for the remainder of the war, among them was the USS Texas.
The Battlecruiser design was heavily criticized after the war. The last British Battlecruiser built was the HMS Hood in 1920. Tragically, the Hood would be sunk 21 years later in World War II by the German Battleship Bismarck. Falling victim to the same plunging shellfire that devastated her sisters at Jutland, there were only three survivors from HMS Hood’s crew of 1418.
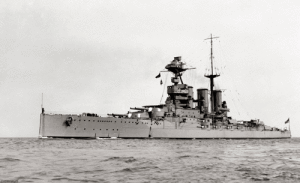
British Battlecruiser HMS Tiger
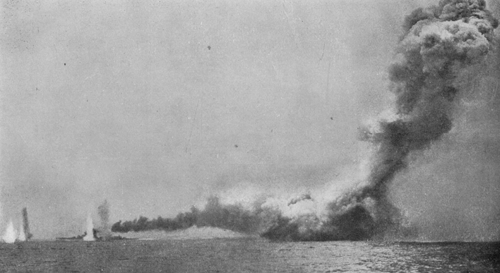
Brithish Battlecruiser HMS Queeen Mary blowing up as HMS Lion dodges German Shellfire nearby. Picture from the Imperial War Museum Archives